by kathilipp | Oct 16, 2014 | Christmas, The Get Organized Project |

It’s almost Christmas. I know you don’t want to hear it, but it’s true and procrastinating about it will not only stress you out, but will cause you to miss the beauty of the season. (Trust me I’m talking to myself here too!) So what are we gals going to do about it? I for one would like to enjoy Christmas this year without a ton of stress. I’d like to focus on Jesus, you know, the reason for the season. This month we are going to focus on 3 areas to Quick Start our Christmas. Then, on November 3, we will begin the 21 Day Organize Your Christmas Challenge.
Quick Start Tip #1: Start your gift list now – with amounts to spend.
Gift giving can truly be the most stressful part of Christmas and it really should be one of the most enjoyable! With tight budgets, picky gift receivers, and Pinterest perfect pressure, it’s tempting to put gifting off for the last minute. For all of those reasons, this seems like the most logical place to start. A gift giving plan will give you focus and help you stick to the budget.
Start by brainstorming all the people that you normally buy gifts for:
- Family
- Friends
- Service people
- Neighbors
- Coworkers
- Teachers
This is also a great time to talk about expectations with those who are on your list.
Several years ago we let our kids know, early on, that our Christmases were going to start looking different. With four kids and not a lot of money, we needed to focus more on family and faith and less on finding the perfect gift. We now give each kid three gifts: Something to wear, something for fun, and something growth (education, spiritual growth.) We have a budget for each kid and stick to it. We used to spend hours opening gifts and getting unwrapping fatigue. Now, the gift portion of our time is small, but the games and talking part of the holiday are what everyone look forward to.
Maybe there are a few people on your list that are on there out of obligation.
What about having a conversation with them about redoing Christmas – instead of buying another body wash gift set for each other, what if you took that money and went to lunch together in January, or went in on a goat for a family through World Vision? Make new traditions with those you love.
Quick Start Tip #2: Grab a Calendar and Firm Up Where and Who
Plan where you will be spending your time – and with whom.
We have a blended family, so trying to share our kids with multiple other families has gotten complicated over the years. Even without a blended family, extended family and all of their extended family can make for some complicated planning. Talk early and often about plans for the holidays. Last year we had everyone on Christmas. This year, we will be hosting the big Thanksgiving feast, and will celebrate Christmas on a different day. Flexibility and early planning with keep you from tears.
Quick Start Tip #3: Sign up for the 21 Days to Organize Your Christmas Challenge
Starting November 3rd, I will be taking you through three weeks of Christmas prep. This is absolutely free – my gift! A few minutes every day, in November, will help you have the most peaceful and Christ-centered Christmas possible. Join me and hundreds of other women for simple ideas to pull off the best Christmas ever.


by kathilipp | Apr 23, 2013 | The Get Organized Project |
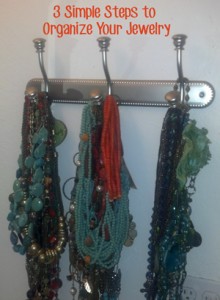
I am a bit obsessed by necklaces – the chunkier the better. Not only do I buy them, I am often given great jewelry by my mom, my kids and believe it or not, Roger hits it on the chunky jewelry nose almost 100%. So keeping it organized is mostly about only keeping the things that I love, and moving the rest on. Here is how I keep my collection under control.

- Get All Your Jewelry Together- This is where you go through your bathroom, your closet, your jewelry box, your purse – everywhere that jewelry hangs out and hides. Get it all in one place so you and deal with it.
- Use the 3 Boxes, 2 Bags System Start to sort through your jewelry using the 3 Boxes 2 Bags System. As you go through your jewelry put every piece in one of the three boxes or two bags: Perfectly good jewelry that you don’t love anymore can go into the “Give Away” box. Everything you love and wear can go into the “Put Back” box. Buttons, prescriptions, receipts, lip glosses and other things that are hanging out with your jewelry go into the “Other Rooms” box. Broken jewelry that you won’t repair goes into the garbage (unless you have a crafty friend who can turn all those crafty beads into something amazing – and is willing to pick them up so they are not around your house for the next month, then put them in the recycle bag.) Put all the Put Back jewelry, back.
- What to do with the Leftovers? OK be honest – there were a couple of necklaces you love but never wear. Or that broken owl necklace that you love, but needs a clasp? You don’t want to throw it away, but you don’t quite know what to do with it. Here are some ideas:


Here are a couple of other things that have helped me: This is the best thing you can do for your jewelry – Only keep what you actually use, make the pieces that aren’t working for you, work.
- Have a necklace that feels a little “Lightweight” for your outfit? Stack it with another necklace. I do this a lot with a chunky gold chain with a couple smaller gold chains, or chunky long turquoise with chunky short turquoise.
- Turn your long necklace into two short ones by looping, or into a bracelet by looping four or five times.
- Have a single earring that you love, but can find it’s friend? Can you turn it into a pin?
Do you have any great ideas for organizing you jewelry that have worked for you? Please share in the comments below (and if you have pictures, send them to info@kathilipp.com – we may do a future blog post sharing your great idea!

by kathilipp | Apr 17, 2013 | 21 Ways to Connect With Your Kids, The Get Organized Project, tips and ideas |
Hi Friends,
I recently received the message below from a reader and I thought as a community we could offer some constructive ideas on how to teach our children help out around the house.
I am greatly struggling with chores and responsibility with my 3 kids.
My 3 year old son is hot and cold with behavior and attitude so one never knows if he will help or fight.
My 6 year old daughter flat out refuses to clean anything “that’s not my mess” yet won’t even cleanup her own room.
My 9 year old son reluctantly helps me out in picking up the slack.
I am a worn out mom in need of new routines and rewards. What kind of charts, rewards and chores can you offer for a challenging group of kids that tend to walk all over an overwhelmed and exhausted mom. Please help.

Need help keeping your kids on task? Download these free chore charts for your kids! In addition, I’ve created a Pinterest board full of ideas on making chores fun for all ages.
Plus, leave a positive idea about how you successfully get your kids to help with chores and you could win a copy of my book, 21 Ways to Connect with Your Kids.

by kathilipp | Apr 15, 2013 | The Get Organized Project |
You can accomplish a great deal while watching your favorite TV program. Here are 30 Organizing Projects you can do the next time your favorite show is on.
1. Clean out your handbag

2. Clear out your phone of email
3. Clean your keyboard
4. Take unused keys off your keychain
5. Match all your unmatched socks
6. Go through a stack of magazines and recycle anything older than three months
7. Check the balance on a gift card online and write the amount on the front with a permanent marker
8. Put bookplates in your books
9. File Recipes
10. Shred documents with personal info on them (only during commercials)
11. Make a meal plan for this week
12. Go through all your pens and throw out the ones that are dried up
13. Go through your DVDs and put any in a bag that you don’t watch anymore so you can give them away
14. Sort your mail
15. Clean out your diaper bag
16. Answer 10 easy emails
17. Grab a kitchen drawer and sort through it and wipe it down
18. Address and send birthday cards for the month
19. Write 3 thank you notes
20. Start a shopping list
21. Fix a button on a shirt
22. Fold three loads of laundry (and put them away during the commercials)
23. Cut out coupons and put them in your wallet
24. Gather up any business cards and put them in your computer contacts
25. Take pictures of your kids artwork before “thinning it out” (throwing it away)
26. Clean out your child’s backpack
27. Make sure your family calendars match
28. Download photos from your phone to PC (or set up for it to be done automatically through Facebook)
29. Order supplies online (ink, batteries, craft supplies, specialty foods, vitamins, etc.)
30. Download movies, audio books or music for your next flight or road trip
Q4USo tell me – what do you like to get done while watching your favorite TV show?

by kathilipp | Apr 10, 2013 | The Get Organized Project |
Stay with me here. I know that those piles of books seem better left untouched- like they just might lead to more bad than good if messed with. But like all organization projects, it is necessary and freeing once accomplished! For ideas on how to organize your books, check out my Pinterest board.
Cull – this means going through your books and making decisions about what to keep, what to put in other rooms, and what to give away. Use my Three Boxes Two Bag System to sort through your books:
1. Purple Box
These are all the books you want to (need to!) keep. Here is my criteria for what books to keep:
a. They are books I read on a regular basis. (The Bible Baby…)
b. They are books I refer to on a regular basis. (Commentaries, devotionals, etc.)
c. They are books I love reading over and over again. (Bird by Bird, Bitter is the New Black,)
2. Orange Box
These are books that have made their way onto your bookshelf, but need to be in other places in your home:
a. Kid’s books
b. Cookbooks
c. Reference books
3. Green Box
For all the books you want to give away, sell, etc.
4. Bag 1 Garbage
There shouldn’t be too many in here, methinks. Your kid let a Popsicle melt on a book, it’s a child’s book that you can’t recycle because of the binding, etc.
5. Bag 2 Recycling
Again, hopefully few – books that no one would want (How to Raise Great Kids by the mother of O.J. Simpson, things like that.)
Once you’ve got them all sorted, you are ready to put them in their place. For all the books you decide to keep, download and print the name plates provided here and put them on the inside of those books. If you print them out on a full sheet of sticker paper (try these full size Avery labels) you simply cut and stick, or use rubber cement if you use card stock.

by kathilipp | Feb 19, 2013 | Home, The Get Organized Project |

Get your free PDF download on organizing your laundry area. This is a 4-page excerpt from Kathi Lipp’s popular book: The Get Yourself Organized Project.
Get Your Free Copy Here
I’d heard of several people making their own liquid laundry detergent, but there was mixing and boiling involved and I thought “Ugh. No Thank you.” But ever since I’d read how much people were saving making their own detergent, every time I picked up the giant tub of suds at Costco and had to pay way too much money, it made my budget very, very sad. (I mean, you could buy three Costco Whole Roasted Chickens for the same price!) So when I saw a couple of people come out with this powdered Laundry Detergent recipe I knew I had to give it a try. Smells great, works great, super easy to make, and I got all the ingredients for under $35. (And I expect it to last at least six months.) The first question everyone asks me is “Are you sure it’s safe for HE washers?” All I can say is that I have scoured the internet looking for anyone who has had a problem with it and have yet to find someone. The main concern is that for HE washers you want a detergent that is less sudsy. Well I’ve sat there and watched my laundry go through a cycle with a store bough HE detergent and this homemade version, (and no, I don’t have better things to do with my time…) and the sudsing was identical. But, if you are of the super-paranoid variety, $12 a month is a small price to pay for peace of mind. My hubby is super skeptical of “alternative” anything, but even he was convinced to give this a try. So far, we are loving it. (Update – we’ve been using this recipe for over six years and have NEVER had a problem with it. So take that for what it is…)
How to Make Homemade HE Laundry Detergent
 Ingredients
Please visit the amazon.com links below to find the latest deals! 3 bars Fels Naptha, grated ($1.33 x 3) 1 box Borax ($5.75 – 76 ounces) 1 box Washing Soda ($4.00 – 55 ounces) 2 cups of baking soda ($0.65 cents) 2 containers of Oxyclean ($12.99 for 7.2 pounds) 1-2 containers of Purex fabric softener crystals ($6.97 – 28 ounces) (One bottle was plenty of smell for my gang!) We found all of the ingredients to make homemade HE laundry detergent at Target and at Amazon. I was not very patient to try this out, so I bought all the ingredients right away. Now I’ll be watching for them to go on sale to try and keep the price down even more.
Directions for making Homemade HE Laundry Detergent
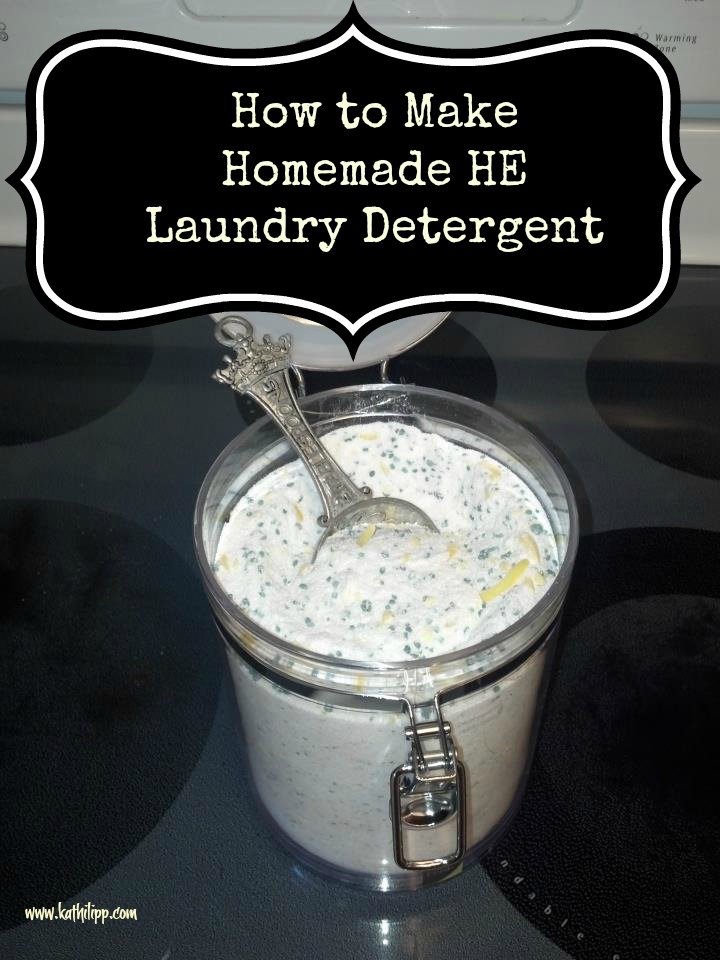
 1. Start by grading the Fels Naptha. I see that most people do this with a hand grater, but the soap is not that hard and I was able to use my food processor to grate it all up. Most people want it more grated (and would use a different blade,) but I loved the cheesey look of it.
2. Next, mix grated soap and the rest of your ingredients together. It seems that most people mixed right into the tub where they were going to store their soap. I wanted to make sure it got completely mixed up, so I used a big black garbage bag lining my bucket and poured everything in there. (Another hint: do this outside! All the powder can be a lot to breathe in.) Gather up the top of your garbage bag and keep tossing all the ingredients over and over until fully mixed.

And here is your finished product. Store soap in a sealed container with a scoop. I transfer what I’ll need for a month into a smaller jar to keep in my laundry area. Use 2 Tablespoons of detergent for every load of laundry. Make sure to put the detergent DIRECTLY INTO THE TUB, not the detergent dispenser.
There are so many things I love about this homemade detergent. It is the ultimate Clutter Free way to do laundry:
- It’s Cheaper: I’m estimating this will save me between $80-$100 over then next 6-9 months
- Less Packaging: better for the environment
- Less Lugging: I hate with a fiery passion lugging all those giant items home from Costco, but love that I can pick up these small items and keep the tub in my garage
- Never Running Out of Laundry Soap – Priceless
And if you’re looking for a liquid detergent recipe, check out One Good Thing by Jillee And for a great stain removal system, check out how my sister-in-law gets out stains every single time. Q4U: Have you made your own laundry detergent before? Do you have other great, ideas about how to keep your bills down? Share them in the comments below. Get your free PDF download on organizing your laundry area. This is a 4-page excerpt from Kathi Lipp’s popular book: The Get Yourself Organized Project. Get Your Free Copy Here


